Albondigas (Meatball) Soup

Everytime I hear the word “albondigas,” it makes me laugh because I think of this scene in How I Met Your Mother (Season 4, Episode 8):

Today I am revealing my “albondigas” for this albondigas soup recipe; the secret ingredient is Trader Joe’s Taco Seasoning Mix. I usually keep these packets stocked in my pantry ready for soups, meat/tri tip marinades (recipe to follow soon), and well, tacos lol. I also find it convenient to bring this seasoning packet when I go on vacation and want to cook a quick soup, and don’t have to worry about packing/buying additional spices. I’ve tried several other taco seasoning mix brands, but this one is the most flavorful and tasty in my opinion. But for those who are sensitive to spice, full disclosure, it has a bit of a kick to it (I’d say the spice level is a 4 out of 10) so this seasoning mix might not be for you (you can substitute with 1/2 teaspoon cumin, 1/2 teaspoon paprika, 1/2 teaspoon garlic powder, and 1/2 teaspoon of oregano instead).

Meatball Ingredients:

  • 1 lb ground turkey
  • 1/2 cup cooked rice (jasmine or basmati rice)
  • 1/3 cup cilantro, chopped
  • 1 egg
  • 1/2 white onion, finely chopped
  • 3 gloves of garlic, pressed (or finely minced if you don’t have a garlic press)
  • Garlic salt & pepper

Soup Ingredients:

  • 2 quarts low sodium chicken broth
  • 2 tablespoon canola oil
  • 1/2 white onion, chopped
  • 5-7 gloves of garlic, minced
  • 1/2 bag of baby carrots (1 lb bag), chopped
  • 2 zucchinis, chopped
  • 1 can (14.5 oz) of diced tomatoes w/ oregano, basil, and garlic (do not drain)
  • 14.5 oz of water (using the can above as the measuring cup)
  • 1 tablespoon chicken bouillon powder
  • 1/2 packet of Trader Joe’s taco seasoning mix
  • 1/2 teaspoon oregano
  • 1/2 tablespoon soy sauce
  • 1/2 tablespoon sugar
  • Salt & pepper to taste

Step 1 – Prep meatballs:

  1. Combine all meatball ingredients together and roll into your desired meatball size and set aside. I usually make it about the size of a golf ball.
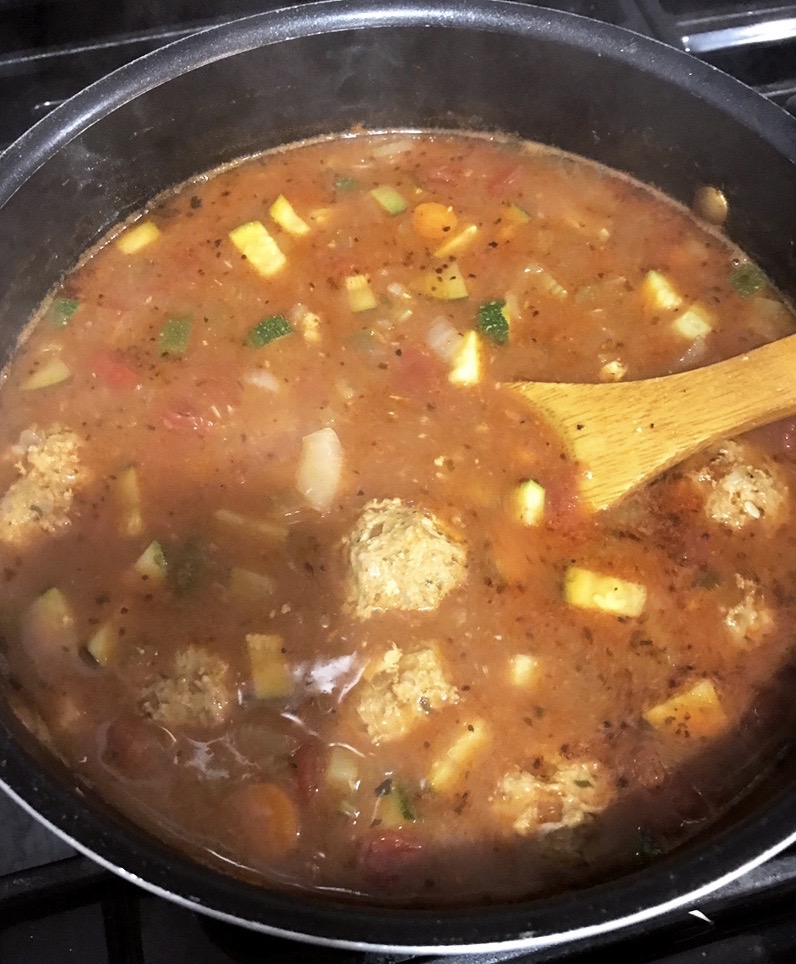
Step 2 – Cook soup:

  1. Pre-heat a pot on medium high heat, add 2 tablespoons of canola oil and saute onions and garlic until fragrant.
  2. Add carrots and cook for another 2-3 minutes, stirring often to make sure onions and garlic do not burn.
  3. Add canned tomatoes, chicken broth, water, bouillon powder and seasonings, and bring it to a boil.
  4. Carefully drop the meatballs in the pot, bring it to a boil again and then reduce to low and let it simmer for 20 minutes to let the meatballs cook through, carrots soften up, and have all the ingredients marry in the broth.
  5. Add zucchini and simmer for another 5-10 minutes.
  6. Add salt & pepper to taste.

If I were to do this again:

  • I’d use my processor to finely chop the onion for the meatball and help keep my tears to a minimum (I keep forgetting I have a processor).
  • Here are some variations to the soup that I also wanted to share, where the base of the broth is the same:
    • Sometimes I get lazy to make meatballs and will instead make a “Taco Soup.” When cooking that version, I use the whole onion in the soup (instead of 1/2 that was used in the meatball), and add the ground meat at step 2 and cook it through.
    • Sometimes I will add canned corn and okra to the “Taco Soup”, and then I call it a “Mexican Gumbo.” Similar to gumbo, you can pretty much experiment with other proteins and vegetables you like in the soup if you want to mix it up a bit. I won’t be offended.
    • Add a sprinkle of shredded cheese (Mexican Style blend) to top it off. Oddly, as I’m writing this, I just realized I only like adding cheese to the soup when the ground meat is not in meatball form. Can’t explain why but it is what it is lol.

Inspiration:

I was actually not inspired to make this by trying an Albondigas Soup, if that’s what you were guessing. When my good friends got married in Cabo a few years ago, the all inclusive resort we stayed at had “Chicken Consomme” on the menu. It was a simple, clean broth with chicken, carrots, zucchini, onions and a side of rice. I basically ordered this every night we were there, because I love soup and it was also the perfect post-drinking meal (I did mention it was an all inclusive resort, right? hehe). When we came back from the trip, I knew I wanted to replicate it with a soup with zucchini, carrots, and onions, but wanted to add a flavor bomb (this is my new favorite phrase) and make a version with ground meat (I love ground meat). It wasn’t until I started researching recipes for Mexican soups with ground meat that I realized Albondigas Soup was a thing.

Unfortunately, I couldn’t find a photo of the Chicken Consomme that inspired me, but here’s a photo of the resort that served it (Grand Fiesta Americana Los Cabos):

Grand Fiesta Americana Los Cabos All Inclusive Golf & Spa

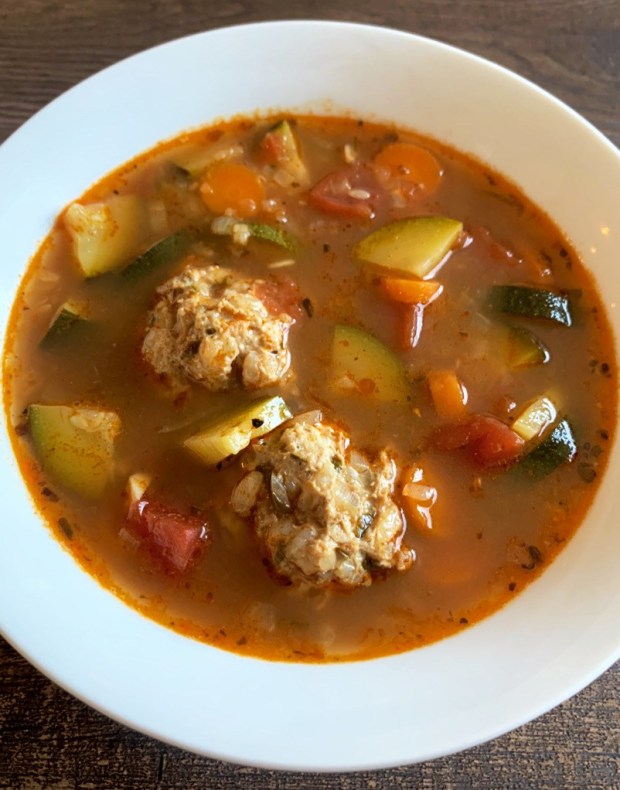
Below is a photo of the first Albondigas Soup I ever made; found it while I was trying to find a photo of the Chicken Consomme (and failed). Returned from Cabo 07/23/2017 and the soup was made 07/25/2017 – I guess I was having cabo/soup withdrawals!…Or I just had a residual hangover and needed soup to cure me. (Btw, I don’t purposely track the dates of when I cook things in case you were wondering…my iPhone automatically captured the date and thought I’d shared some historic data lol).

Dungeness Crab w/ Garlic, Scallions, Ginger, and Lemon Grass

Dungeness crab is one of my favoritest foods of all time and it always has been since I was a kid. Now that I think about it, it was probably the only seafood I really enjoyed growing up. I had a psychological aversion to shrimp where the flavor and texture of it would make me gag; I can’t explain why, but my mom said it started when my uncle brought back live lobster and shrimp from Alaska and it apparently freaked me out. I don’t know if that’s the true origin story of where my distaste for shrimp began, but for a while I could not eat anything that resembled it in its flavor or chewy texture (lobster, scallops, clams, mussels, etc.). I’m only slightly affected now – I enjoy eating lobster, scallops, and clams. I can eat shrimp (I won’t gag or die), but I still don’t enjoy it very much. I don’t know why I’m sharing this on here, but let’s just call it a (subjectively) fun fact lol. Anyways, my cousin’s best friend is a pretty good cook (the bully that made fun of my pasta dough in my other post); she posted a video of her crab on instagram a while ago that looked good and I asked her for her recipe. She was not very helpful with instructions/measurements (if you’re reading this: GARBAGE lol) but I took her ingredients as a guideline and winged it with some modifications. Below are my best guestimates of the measurements I used.

Note: She typically flash boils the crab and then bakes it in the crab fat/sauce for about 15-20 minutes at 375°. I had already pre-cooked my crab so I ended up cooking it on the wok to avoid over cooking/drying out the crab in the oven. I’ll try her cooking method next time.

Ingredients:

  • 1 dungeness crab (1.5 – 2 lbs)
  • 3 green onions
  • 6 garlic cloves
  • 2 inch piece of ginger root
  • 2 tablespoons of processed lemon grass (not in her original recipe)
  • 1 tablespoon Chicken bouillon powder
  • 1 tsp red chili flakes (not in her original recipe)
  • 1/2 tsp cayenne powder (not in her original recipe)
  • 1/2 tablespoon sugar (not in her original recipe)
  • 2 tablespoons of unsalted butter
  • 2 tablespoons canola oil
  • 1/2 cup water (not in her original recipe)
  • Maggi seasoning (not in her original recipe)

Step 1 – Prep Crab:

  1. Clean crab
    1. I bought a live dungeness crab at an asian seafood grocery store, so I rinsed it with water and cleaned its exterior with a toothbrush (it was new and unused for you trolls out there lol). I used tongs to hold it at its stomach so it wouldn’t clamp me with its claws – be careful here!
  2. You can choose to boil or steam the crab to cook it; I decided to steam it by boiling an inch of water in the pot, and putting the crab in there with the lid on for 12 minutes (the guideline is to steam it 7-8 minutes for every lb it weighs).
  3. I put it in an iced water bath after for about 5 minutes to stop it from cooking more.
  4. Pull off the shell of the crab; the gunky stuff in its shell is called “crab fat.” Reserve this because it will be used for the sauce.
  5. Remove the crab lungs and then cut up the crab into serving pieces.

Step 2 – Prep Veggies:

  1. Mince garlic.
  2. Cut green onions into 2 inch pieces.
  3. Peel and thinly slice ginger.

Step 3 – Wok it Up:

  1. Preheat a wok on medium high.
  2. Heat up canola oil, and then throw in garlic, ginger, lemon grass and stir fry for about 10 seconds.
  3. Add butter and crab fat; stir for 1 minute.
  4. Add in the green onion.
  5. Season with bouillon powder, chili flakes, cayenne pepper, sugar, and maggi sauce.
    1. Taste the sauce, if it’s oversalted, add water and/or sugar to balance it out. I added about 1/2 a cup of water; I just filled up the the crab shell with water to get any remnants of the crab fat and poured that into the wok.
  6. Continue to cook for another 1-2 minutes to re-warm up the crab and let the sauce cook into it.

If I were to do this again:

  • Add sliced jalapenos for extra heat if remaking this dish.
  • Try out the original recipe as intended and follow her cooking method of flash boiling and then baking the crab.

Inspiration:

Kimmy’s crab + my mom’s crab, since she uses maggi in her crab recipe sometimes.

Baked Curry Chicken Wings w/ Cilantro Spinach Chutney

Alright, I’ve gotta admit that I’m super proud of how these wings turned out. It was my first time attempting to make wings crispy in the oven (I had my doubts) and I was so excited when it actually came out crispy! I still think this would have tasted better deep fried, but not bad for baked wings. For the seasoning, I wanted to try something different from my usual go-to cajun / buffalo wings and decided to make a curry flavor. I would usually use a wet marinade on the chicken, but since I had to keep the wings dry to obtain maximum crispiness in the oven, I decided to season the chicken with a dry rub overnight and then further infused the curry flavor/seasoning into the cornstarch coating prior to baking. The chutney idea came to fruition because I had cilantro in the fridge that was going to go bad if I didn’t use it. I added spinach to it because I put too much lemon juice and needed more body to the chutney lol; but it worked out since apparently spinach is used in some chutney recipes so I didn’t butcher it completely…hooray! :).

Chicken Wings Ingredients:

  • 2 lbs chicken wings
  • 3 tablespoons cornstarch
  • 2 tablespoons curry powder
  • 1 tsp turmeric
  • 1 tsp cumin
  • 1 tablespoon garlic salt
  • 1 tsp onion powder
  • 1 tsp paprika
  • 1/2 tsp oregano
  • 1/2 tsp cayenne powder
  • 1/2 tsp pepper

Step 1 – Season Chicken:

  1. The measurements above were written as guestimates for the cornstarch coating, but I did season the wings overnight with garlic salt, onion powder, paprika, oregano, cayenne powder, and pepper in similar measurements (basically everything above minus the cornstarch, curry, turmeric, and cumin).
    1. I only omitted the curry flavor at this stage because I hadn’t fully committed to it at the time lol. I use the same seasonings above for cajun wings, so I would include a tablespoon of curry powder at this step if I did it again.
  2. I didn’t read this tip prior to completing this step myself, but other recipes recommend to leave the wings uncovered in the fridge overnight to help dry out the wings to make it crispier baking. I ended up leaving it uncovered only for 2 hours but that seemed to suffice.

Step 2 – Coat the Chicken:

  1. Line a baking sheet with foil, and put the wired cooling/roasting rack on top. I put oil on a napkin and greased the rack.
  2. Add all the dry ingredients listed above to a bowl and mix evenly.
  3. Pat chicken dry with a napkin, and then coat wings evenly in the cornstarch mix. Shake off any excess mix from the wings.

Step 3 – Cook the Chicken:

  1. Preheat oven to 250°F. Bake wings for 30 minutes, rotating the sheet after 15 minutes.
  2. Crank up the oven to 425°F, and bake wings for 50 minutes, rotating the sheet after 25 minutes.

Chutney Ingredients:

  • 1 bunch of cilantro
  • 10 spinach leaves
  • 2 garlic cloves
  • 2 thai chilis
  • 1/2 lemon for the juice
  • 1 tsp garlic salt
  • 1 tsp cumin
  • 1 tsp sugar
  • 1 tablespoon soy sauce
  • 1 tablespoon of garlic/ginger paste (shout out to my old roomie for introducing this to me…game changer)
  • Olive oil (I roughly matched the amount of lemon juice)

Step 1 – Process the Chutney:

  1. Combine all ingredients above to a processor and grind it up.
  2. Add more salt and pepper as needed.

If I were to do this again:

  • I’d add curry seasoning, soy sauce, and oil to wings and marinate it overnight for more flavor. I’d then pat it dry after and then leave it uncovered in the fridge for 2-4 hours (or for however long it takes for the skin to look dry).
  • I’d take out one thai chili from the chutney…two was a little spicy for me.

Inspiration:

My love for chicken wings and curry. And the fear of cilantro going bad and being wasted (I guess the latter was more of a motivation than an inspiration lol).

Tagliatelle al Ragu Bolognese

Ciao! I took a cooking class when I visited Bologna last summer and figured quarantine life is the perfect time to recreate some of the recipes I learned: fresh tagliatelle pasta and bolognese. The original recipe provided by the instructor calls for 100 grams of ground pork and 100 grams of ground beef in the bolognese, but I substituted with ground turkey since it’s what I had on hand. Shout out to Chef Luigi! (Yes – that is really his name lol).

Bolognese Ingredients:

  • 1 lb of ground turkey
  • 1 white onion
  • 1 celery stalk
  • 1 carrot stick or ~10 baby carrots (I matched the quantity of the celery)
  • 3 garlic gloves (original recipe does not have garlic)
  • 1 cup red wine (+ the rest of the bottle for drinking)
  • 1 cup chicken broth (original recipe calls for beef broth)
  • 2 tablespoons of tomato paste
  • Extra virgin olive oil
  • Salt and pepper to taste

Step 1 – Prep:

  1. Finely chop onions, celery, and carrots.
    1. I personally like the veggies finely chopped so that it’s indistinguishable in the sauce – keep it a mystery meat, y’know? Lol, jk, truthfully it’s just a texture preference for me. I didn’t cut it as finely as a I preferred this time because I was lazy but would definitely go finer next time.
  2. Mince garlic.
    1. The instructor mentioned that garlic is not traditionally used in bolognese. I told him that I’d use it anyway when I re-make it at home, and he said he would do the same if he cooked it for himself. Glad to know Chef Luigi and I were on the same page about garlic and he’s not a vampire.

Step 2 – Cook:

  1. Add olive oil and veggies to a cold pan and then turn on the heat to medium. That’s right folks – I said cold! Since the veggies are so finely chopped, the instructor advised us not to preheat the oil so that the veggies will not fry/burn.
    1. Veggies should also be swimming in olive oil as well, not drowning or hanging out in the shallow end. Hm, maybe I should have taken a photo to better exemplify this, but hope my metaphor is helpful lol.
  2. Saute until onions look translucent, add ground turkey, turn up the heat to medium-high and cook through.
    1. Be sure to stir frequently so nothing sticks and burns.
  3. Stir in a cup of red wine, once it comes to a boil, reduce the heat to low.
    1. Reminder to follow the rule of thumb to only cook with alcohol that you’d actually drink. If it’s crappy wine, it’ll make for a crappy dish, and you’ll just feel crappy. Don’t do that to yourself.
  4. Cover with a lid and simmer for a minimum of 2 hours.
    1. Check the sauce and stir every 20 minutes or so to make sure it doesn’t burn.
    2. If liquids reduce, add broth as needed so it doesn’t burn. I ended up adding a about a cup of chicken broth after one hour.
    3. Chef Luigi suggests simmering for a minimum of 2 hours but encourages it for longer. “If you don’t cook it for 2 hours – it’s not bolognese!” I only cooked it at 2 hours because I was hungry and wanted to eat it lol.

While the bolognese sauce was cooking, I transitioned into pasta making.

Pasta Ingredients:

  • 400 grams all purpose flour (original recipe calls for semolina)
  • 4 large eggs
  • Olive oil

Step 1 – Make Dough:

This started off as a major fail and I didn’t think I could recover from it, but managed to make it work afterall lol. Thank goodness for that, since eggs are hard to come by during this pandemic, I was relieved I didn’t just waste precious ingredients! The original recipe from Chef Luigi called for Semolina flour, I only had all purpose flour to work with. When I mixed everything together, the dough was super hard and not easy to work with. I was facetiming with my cousin and her best friend at the time, and was ridiculed for it looking like “dry ass pasta.” Jerks…they weren’t wrong though, but still lol. Anyways, after asking some friends for advice and googling how to fix the pasta dough, I ended up adding some olive oil to help make it more malleable. I read on this website that the consistency you want to go for is like playdough and thought that was a helpful comparison. I rolled the dough into a ball, wrapped it in seran wrap, and then put it in the fridge for 15 – 30 minutes.

Step 2 – Make Pasta:

I used the Marcato Pasta Machine. Started with level 1 on the machine, and worked through each level until reaching level 6 (level up! gamers – amirite?). Then ran it through the tagliatelle attachment to cut it into noodles. Let it hang dry for at least 15 minutes.

Step 3 – Cook Pasta:

Boil the pasta in salted water for 3 minutes. Water should be as salty as the ocean, Chef Luigi says adding oil in the water is not necessary because there’s not enough oil in the water to actually prevent it from sticking to one another.

Final Steps – Plate Food:

Plate pasta, add sauce, and top off with parmesan cheese if you have it. Prego!

If I were to do this again:

  • Chop veggies more finely
  • Add dried italian herbs for extra seasoning/flavor
  • Cook longer than 2 hours to see if I can taste the difference
  • Use ground beef/ground pork and beef broth as the original recipe calls for

Inspiration:

Chef Luigi’s cooking class.

Cajun Fried Rice (from leftover Boiling Crab sauce)

Cajun fried rice made with leftover Boiling Crab sauce. I ordered Boiling Crab to-go the other day and specifically ordered sausage and corn in a separate bag so I could get extra sauce to make fried rice with it (#lifehack number 1 – you’re welcome). I merged the leftover sauce from my seafood bag with it so I could have more sauce + seafood flavor.

Ingredients:

  • Leftover Boiling Crab sauce
  • Leftover Andouille Sausage
  • 2 cups cooked Jasmine rice
  • 1/4 of an onion
  • 2 cloves of garlic
  • 1 celery stalk
  • 1 chicken bouillon powder
  • 2 tbs tomato paste
  • Garlic salt
  • Oregano
  • Soy sauce
  • Sugar

Step 1 – Prep:

  1. Dice onions small and cut celery to match the size.
  2. Mince garlic.
  3. Cut sausage into preferred bite-size.

Step 2 – Cook:

  1. Heat up a pan, add canola oil and sauté onions and garlic till aromatic.
  2. Toss in the celery, add in a sprinkle of oregano, and sauté until onions are translucent.
    1. I like adding in the dried herbs at this stage so that the flavor can be released in the oil (as opposed to adding it once the rice is in the pan).
  3. Throw in the sausage and boiling crab sauce, basically cooking it to warm it up now.
  4. Sprinkle of chicken bouillon powder
    1. I added this because I like things extra savory and thought it’d kick it up a notch (or maybe I’m just extra lol). It’ll probably taste fine without it so I wouldn’t go out of the way for it.
  5. Throw in the cooked rice.
  6. Squeeze in tomato paste – about 2 tablespoons
    1. Btw I just recently discovered tomato paste in a tube (#lifehack number 2 for the day – you’re welcome). The shelf life is much longer than an opened can of tomato paste (~45 days vs 5-7 days). So much easier and more convenient to use, especially when a recipe only calls for a little bit of it.
  7. Continue to toss until everything is evenly mixed in.
    1. My rice was a little hard to mix because it was cold, so I turned my heat on low and covered it with a lid to let it soften up a little.
  8. Sprinkle of sugar, garlic salt, and soy sauce to taste.
  9. Garnish with window-sill re-grown green onions (in the time of COVID-19)

If I were to do this again:

  • Add green bell peppers
  • Or do everything exactly the same because it was delicious

Inspiration:

My mom, because she always makes fried rice with leftover lobster from Chinese restaurants.

Shanghai Noodles

Shanghai Noodles was one of my childhood favorites. There was a Shanghai restaurant called 369 in Milpitas that my cousin Jenn and I would always ask our parents to pick up from in elementary/middle school; I was so sad when it closed down, but funnily enough, when I moved to Anaheim (2004), there was a 369 restaurant a couple miles from my house. That place has closed down since, but at least I was able to enjoy it for a few more years and the memory of it still lives on lol. If you know of any places with good Shanghai Noodles, please send it my way! Below is a variation I made with the ingredients I had on hand (during the time of COVID-19).

Ingredients:

  • Banh Canh noodles (wheat/tapioca/rice flour)
  • Napa cabbage
  • Pork tenderloin
  • Green onion
  • Garlic
  • Soy sauce
  • Thick soy sauce
  • Sugar
  • Garlic salt
  • Pepper
  • Sesame oil
  • Canola oil

(Sorry, everything was eyeballed/done to taste with no measurements. You can trust your inner chef and wing it following my guidelines/instructions…otherwise, I linked some recipes/videos down below under “Recipes I read/watched” from more legit recipe writers lol).

Step 1 – Marinate pork:

  1. I sliced up the pork into match stick size and marinated it with soy sauce, sugar, garlic salt, pepper, cornstarch, canola oil, and a drizzle of sesame oil.
    1. Cornstarch was used to tenderize the meat.
    2. I used canola oil for better adhesion of the seasoning/marinade, and sesame oil for a hint of flavor.
  2. Let it marinate for a minimum of 10 minutes.

Step 2 – Chop (washed) veggies:

  1. Cut green onions into 2 inch length.
  2. Cut napa cabbage to match stick size (matching size of sliced pork) – separate leaves w/ the core (since cooking times for each will vary).
  3. Mince garlic.

Step 3 – Cook:

  1. Heated up a wok on medium high, added canola oil and cooked the pork through (couple minutes).
  2. Removed pork from the wok and put it on a plate to add it back in later.
  3. Threw in the minced garlic into the wok until aromatic.
  4. Microwaved the banh canh noodles for 2 minutes, and tossed it into the wok.
  5. Poured maybe 1/2 cup of water over the noodles, covered the wok with a lid to let it cook for about 5-6 minutes.
  6. Uncovered and threw in the chopped napa cabbage cores and stir fried till cooked (added a little more oil).
  7. Season with soy sauce, thick soy sauce, sugar, pepper, sesame oil.
  8. Added the cooked pork, chopped cabbage leaves, and green onions in and stir fry for another 1-2 minutes.

If I were to do this again:

  • Buy correct Shanghai noodles (wheat flour)
  • Buy shaoxing wine
  • Experiment with different soy sauces and oyster sauce
    • The recipes I’ve read called for light + dark soy sauce
    • I have Kikkoman soy sauce (is this light or dark or something else? lol) + thick soy sauce

Recipes I read/watched:

Inspiration:

369 Restaurant (RIP)

Shanghai Noodles - 369